
When I was 8, I got to spend a week with my mom’s parents and pretend I was an only child. That week was life-changing because my grandmother taught me to sew. Meemo had been taught by a dressmaker and was an amazing seamstress. Since I was only 8, I only learned the basics but it was enough to set me on the path.
I made some truly sad looking things at first. I was rushing to finish things and made careless mistakes. At one point my mom, who had basic sewing skills, told me I had to do a better job or she wouldn’t buy me more fabric. I knew my mom meant it so I took more care. In my junior high school home ec class I already knew quite a bit and was a snotty know-it-all. I think the teacher was ready to strangle me. In high school, I made the three dresses I wore to formal dances. My favorite was the slinky red Qiana halter dress and matching bolero jacket that had marabou feather boa trim on the cuffs and shawl collar. I wore it with platform sandals. I remember thinking I was fat!
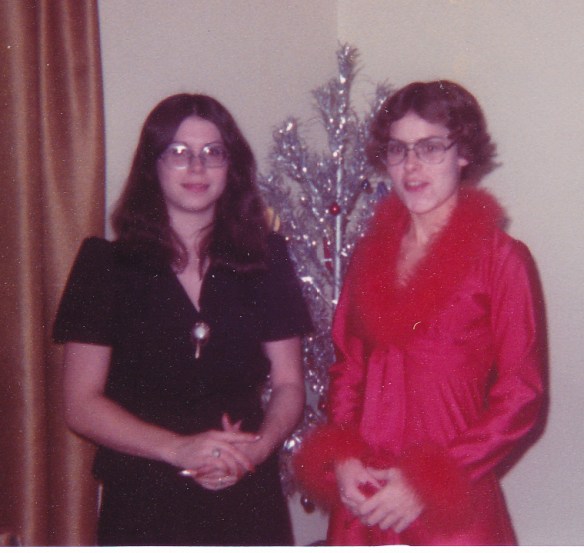
Here’s the lovely red Qiana formal I made. My younger sister is to my right.
When I started college, I wanted to be a textile research scientist. I started as a home ec major because they had a textile analysis program. I ended up changing majors a couple times but am glad I started out this way because I was able to take some amazingly sewing classes for college credit and improved my sewing chops dramatically, including pattern alterations.
In my 20s, I made a lot of my clothes because it was cheaper (it was the early 80s) and they would actually fit. I even made many of the suits I wore to work. I discovered an awesome fabric store in the DC suburbs, G Street Fabrics and took some amazing skill and fit focused classes. I still have the pattern alteration reference materials I purchased at that time.
I continued to make clothes, especially casual ones, into my 30s but stopped after I gained a lot of weight and didn’t feel good about my body.
Since I quit sewing clothes, I’ve done some home dec sewing. I’m most proud of the queen-size quilt I made about 10 years ago. I’m sure I’ll make a couple more but don’t anticipate it becoming an obsession.

Fast forward to last year… I’m retired and have more time to play. I’ve made many project bags to hold my knitting projects and as gifts. Many knitters I know in person, from Ravelry, IG or other digital sources are sewing. I see many IG posts during #MeMadeMay and pout because it’s too hot to wear any of my knitted socks or sweaters in May. I learn about indie pattern designers and online fabric stores. I get the itch to make clothes again.
My first few attempts were a total fail. I started with an indie sewing pattern and made a couple wearable muslins. When I tried on the second iteration, it wasn’t flattering but worse… I wasn’t able to take it back off. Luckily, the side seams were only basted; I had to unpick the side seam to take it off. If I were a newbie, I would have quit after that disaster. Instead, I decided I would stick with top patterns that have closures or are made with knit fabrics.
Before tackling any more tops, I decided to sew a skirt. I started to draft my own skirt pattern but stopped when I decided it was time to join Weight Watchers and get back to a healthy weight. It just doesn’t make sense to work on ‘perfect fit’ when my body is changing almost weekly.
Instead, I’ve sewn four simple skirts from the same pattern, Sew So Easy’s Simple Summer Pleated Skirt. For two, the first and also my most recent, I used some knitting-themed quilting cotton while the other two are more “normal” cottons. This pattern has a contour waistband, front and back pleats, pockets and a back zipper. I wasn’t really happy with the pocket and swapped it out for the Suki Kimono pocket on my most recent version and I’m much happier. Eventually I’ll make more fitted patterns with front and back darts but this pattern is perfect while I’m losing weight.

Pictures clockwise starting with the large photo: Suki Kimono, Perfect Tee Shirt and Summer pleated skirt, Mandy Boat Tee
I’ve also made a Helen’s Closet “Suki Kimono”, Pamela’s Patterns “The Perfect T-Shirt” and two Tesutti “Mandy Boat Tee”.
I didn’t like the fit on the first Mandy Boat Tee I made. It was a bit too tight in the arm and not quite as boxy as I’d hoped. I made a few simple mods and am thrilled with the second one. I made it 4″ wider in circumference by adding 1 inch vertically between the center and side seam on both the front and back. I also added 1/2″ length to both the front and back in the armscye area and an inch to the width of the sleeve. The result was perfect other than body length so I made it about 5″ shorter so it would hit high-hip instead of being a tunic. Now, I’m obsessed with the it and want a dozen. In fact, I’ve already got fabric lined up for my next two. Off to cut out the first one.


